My first look at Azure IoT Hub
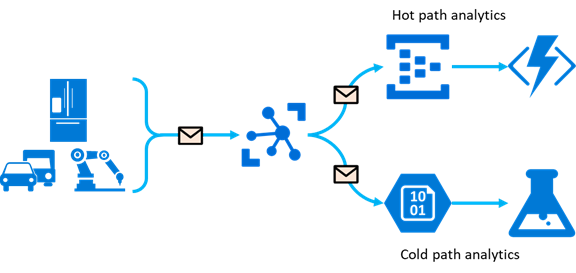
I recently decided it was time for me to take a shot at passing another few Microsoft exams. While studying for one of them, I noticed that I didn’t knew too much about Azure IoT Hub. I had never come across it in my daily job. So I gave myself the following goal: have something that acts as an IoT device that sends data into Azure IoT Hub and have something read that data and does something useful with it. When talking about the data that comes out of IoT Hub we usually split that into a hot and/or cold analytics path, in this blog I’ll show you an example of both.
The end-goal of this blog
This blog will be a combination of a lot of useful docs and blogs I found while searching for my answers. I’m not going to repeat what’s in there but sometimes just point you to them. This will be an the-end-to end story in which we will start with a simulated IoT device and end with an app showing that data in realtime and the data stored for long-term analysis using Azure Stream Analytics and Azure SQL Database.
Hot and cold path analytics
IoT Hub can write messages to multiple endpoints, so you can both send the message through a hot-path analytics pipeline, as well as push the message to for example a storage account for cold-path analytics or long-term archival. Cold-path analytics are used to process data which requires more complex processing than simple windowing or thresholding and often uses data from devices over a longer period of time.
Setup an Azure IoT hub
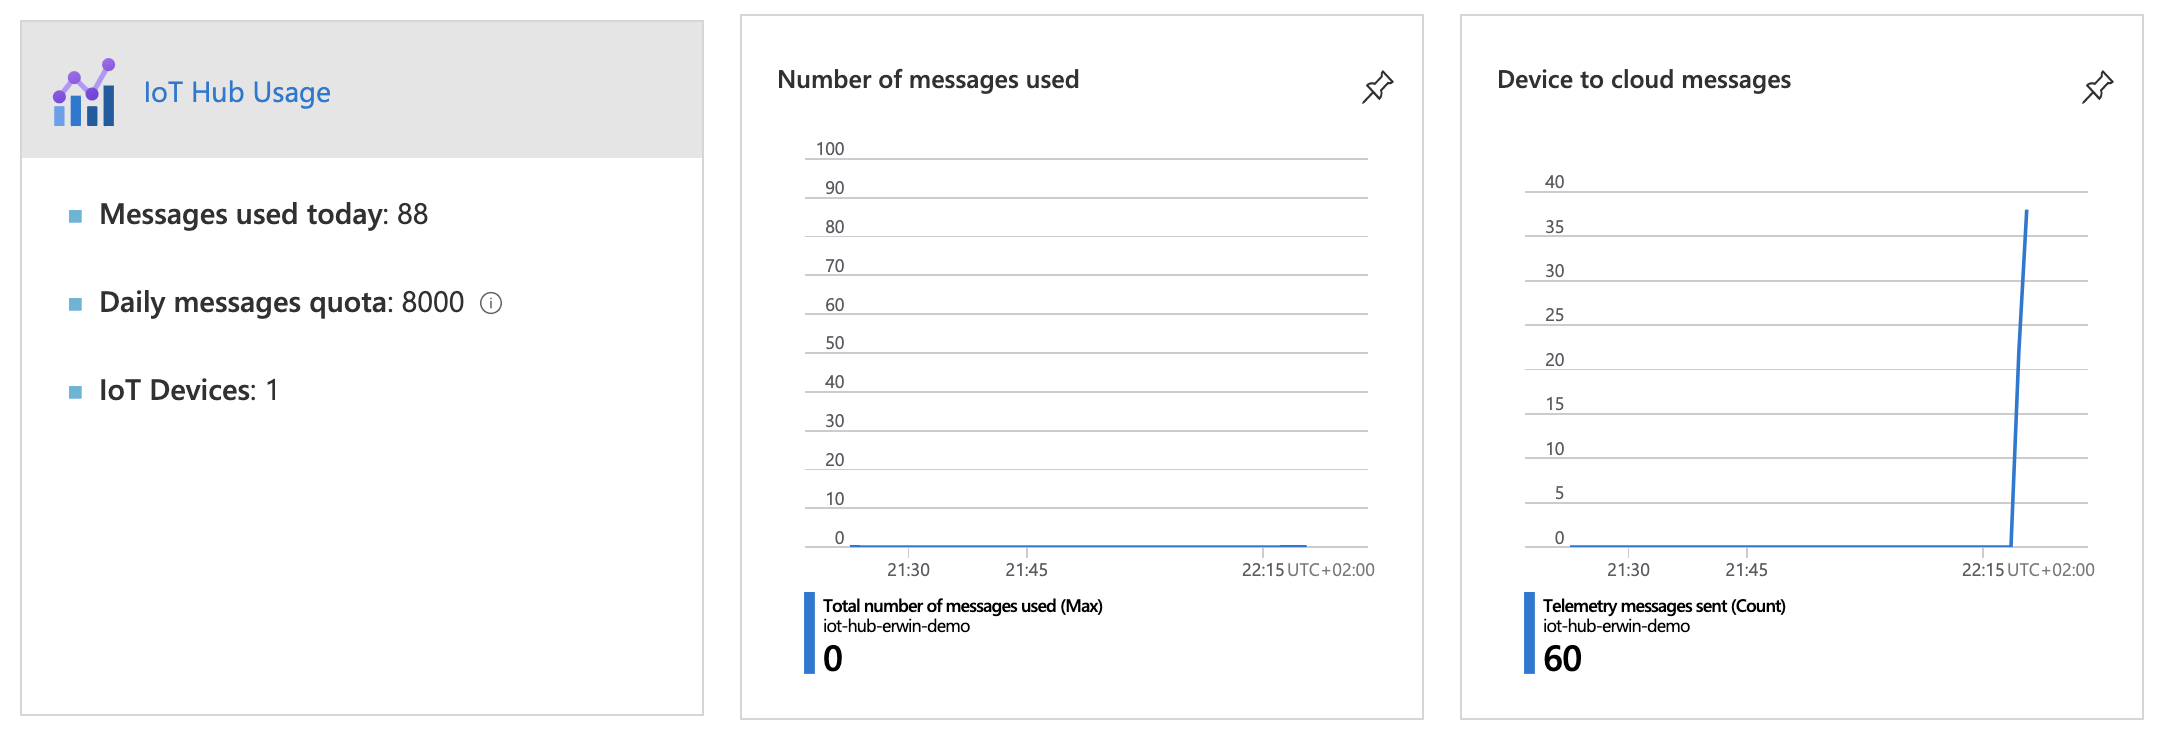
First step is obviously to create an Azure IoT hub. Here’s the ARM template to do that. Make sure to change the name. This will create a free IoT hub that obviously has a few limitations compared to a paid one, especially the 8000 messages a day limitation is one you hit quite quickly.
{
    "$schema": "https://schema.management.azure.com/schemas/2015-01-01/deploymentTemplate.json#",
    "contentVersion": "1.0.0.0",
    "parameters": {},
    "variables": {},
    "resources": [
        {
            "type": "Microsoft.Devices/IotHubs",
            "apiVersion": "2020-03-01",
            "name": "iot-hub-erwin-dummy",
            "location": "westeurope",
            "sku": {
                "name": "F1",
                "tier": "Free",
                "capacity": 1
            }
        }
    ]
}
The nest step is to register a device with the Azure IoT Hub. This can easily be done using the Azure CLI:
az iot hub device-identity create --hub-name <YourIoTHubName> --device-id <YourDeviceName>
We need it’s connectionstring to send data, let’s fetch that using the following command:
az iot hub device-identity show-connection-string --hub-name <YourIoTHubName> --device-id <YourDeviceName> --output table
Creating sample data
Time to send some data to our Azure IoT hub! Microsoft created a nice demo app to do just that by simulating a device. Head over to their docs and follow the 4 steps in this paragraph: https://docs.microsoft.com/nl-nl/azure/iot-hub/quickstart-send-telemetry-dotnet#send-simulated-telemetry
After a minute or so you should see the first messages coming in on the dashboard of you Azure IoT Hub. Don’t forget to stop the app because of your daily messages limit.
The hot path
The hot path is often being used to show data in real-time on a dashboard for example or to do alerting on. Before we can consume data from the IoT Hub we have to do some additional setup. First, we need to create what’s called a consumer group. A Consumer group gives you a view on the data in Azure IoT hub and allows you to read that independently of other apps or services (consumers) and thus allowing you to read the same data multiple times for different purposes. To create one and get a connectionstring to it, run the following cli commands:
az iot hub consumer-group create --hub-name <YourIoTHubName> --name <YourConsumerGroupName>

az iot hub show-connection-string --hub-name <YourIoTHubName> --policy-name service
Follow the steps in this blog by Microsoft up until the point where you have the app running locally: https://docs.microsoft.com/en-us/azure/iot-hub/iot-hub-live-data-visualization-in-web-apps#download-the-web-app-from-github
The cold path
Like mentioned before it’s also useful to have some kind of cold storage for future or more complex analysis of the data. Since we don’t always know how we are going to use the data at time of saving it, we want to store the data in it’s most raw format. In Azure you have multiple options to choose from. We could for example use Azure Storage Accounts or CosmosDB. In this blog I’m going to show you how to use Azure Stream Analytics and Azure SQL Database. MSSQL turns out to have nice features to work with JSON data stored in your database. The flow will be: Azure IoT Hub –> Azure Stream Analytics Job –> Azure SQL Database. We already created the IoT Hub so let’s create the Stream Analytics Job and SQL Database. I will not go into those details here. It’s just next, next finish with all the default in the Azure portal. Ones we’ve got those two resources it’s time to do some configuration on them.
Configure the SQL Database table
We’re first going to create the table in sql that will hold our data. As mentioned before we want to save the data in a raw format to keep most of the details. We’re going to save the message on the IoT Hub in json format. Here’s the definition off the table.
CREATE TABLE [dbo].[Telemetry](
	[_id] [bigint] IDENTITY(1,1) NOT NULL,
	[sensorData] [nvarchar](max) NULL,
	[deviceName] [nvarchar](255) NULL
)
Configure the Stream Analytics Job
In the hot path we used a specific consumer group on IoT Hub to get the data for the UI. Use the same cli commands again to create another one for this cold path processing, I called mine ‘streamanalytics’. You can also navigate to the Azure portal, find your IoT Hub and go to the Build-in Endpoints blade and add it there.
Navigate to the Stream Analytics job you created earlier. Go to endpoints and click ‘add stream endpoint’ and select IoT Hub. Find your IoT Hub and make sure to select the correct consumer group and set the Event serialization format to JSON. Go to the output blade, click Add and find SQL Database. Select your database and make sure to select the correct table.
Two more steps to take. The first step is to create the query that will be used while processing the data and transforming that into a form that our SQL table understands. Here’s the query I’m using:
SELECT
IoTHub.ConnectionDeviceGenerationId AS _id,
IoTHub.ConnectionDeviceId AS deviceName,
UDF.ConvertToJSONString([iot-hub-erwin-demo]) AS sensorData
INTO
    [sqldb]
FROM
    [iot-hub-erwin-demo]
As you might notice, there is a custom function in that query: UDF.ConvertToJSONString(). UDF stands for User Defined Function. I already mentioned that we’re going to save the data in a JSON format and this function will transform the incoming message into a JSON-string. We need to add that on the Functions blade. Navigate to it and click add, choose ‘Javascript UDF’ from the list. Below you will find the definition of the function. Select nvarchar(max) as the output type.
function main(x) {
   return JSON.stringify(x);
}
Our Stream Analytics job is ready to go. Start it by going to the Overview page. After a short while you should see data flowing into your SQL Database.
SQL JSON query
Now that we’ve saved some data in our table, how do we query that? MSSQL has build-in functions to work with our JSON data. The following query for example lets us find the first 10 records where the temperature is above 20.
SELECT TOP 10 _id, JSON_VALUE(sensorData, '$.temperature') as 'Temperature'
FROM Telemetry
WHERE CAST(JSON_VALUE(sensorData, '$.temperature') as float) > 20
Here you can find more information about the JSON feature in SQL Server. The performance of this solution might not be good enough in your scenario when you save a lot of messages. And that’s fine. We optimized for saving a lot off messages quickly here. There are however good options to make this performant as can be found in this Microsoft doc.